Friday, December 30, 2011

New Stick Shawl Pins

We hope you had a nice Christmas.  Dave wanted to create some long lasting memories for our anniversary this year and took a hard fall on our icy front steps and landed on his hand.  He ended up with a dislocated finger and his hand broken in two places.  We spent the day at the Salmon Arm emergency where they managed to put his finger back into place and then over to the Kelowna hospital (another city) to have surgery on his hand later that evening.  We had to stay at a hotel as it was too late to drive the distance home that night.


Dave is doing much better now and trying to get use to the added weight of the cast.  He won't be able to help me as much until he has the use of his hand again, however.


I have been rather busy and so I haven't had time to list many new items in our ArtFire Studio or Etsy shop but hoping to get around to that over the next week or so.


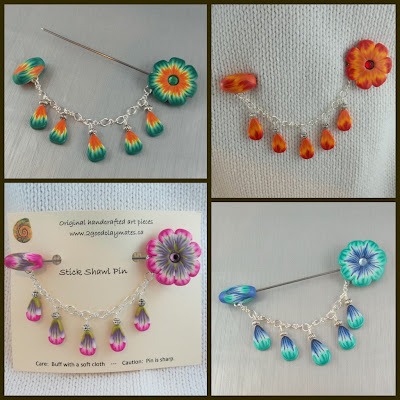
I finally listed a few of our Abstract Floral Stick Shawl Pins.  We have been selling them at our Christmas shows and in several local yarn stores.  It is my own original design that I dreamed up over the summer with plenty of flowers in our garden for inspiration.  These pins go nicely through tighter weave fabrics where our typical shawl pins do not fit.  Click on the photo below to see more of our pins listed in our shop.


Sunday, December 25, 2011

Merry Christmas! Celebrating 25 years together!

We just want to wish everyone a very Merry Christmas.  This  is an extra special time for my claymate, Dave and I as we are celebrating our 25 years of marriage.


Friday, December 23, 2011

Sandscape Collars

Here are a few more new necklace collars combining Julie Picarello's technique with Wendy's CaBezel moulds.  The green one is sold but I have listed the one in cranberry in our ArtFire Studio.  I show how to make the little cube spacer beads in my tutorial, Make Your Own Rondelle Spacer Beads.


Wednesday, December 21, 2011

Desert Reflection

I created one more of the Lizard CaBezel Collars which we have now named "Desert Reflection".  This one is in Olive green and gold and the lizard tail pieces almost have a tortoise shell look.  This one is a favorite, but maybe because I love the color green.


We are all finished with selling in any markets now for awhile so just need to focus on filling orders for stores.  When I have time I will be slowly adding some of our latest pieces to our ArtFire Studio to sell.

Tuesday, December 20, 2011

Home Again

It was a fun weekend but is so nice to be home again.  We ended our weekend by spending the Sunday afternoon at Heather's Fabric Shelf in North Shore, Kamloops.  She had a Sip & Shop Tea Party with Kevie from Specifically Tea giving out samples of delicious teas.  We were asked to join in and set up a jewelry display to sell as well.


We had an enjoyable time getting to meet many of Heather's customers.  Dave had fun there too!  (I think he was trying to make me a little jealous -- ha!... lol!)


There was a good selection of fabric on sale which was really hard for me to resist this stack with the hot chili peppers.  We will be painting our living/dining/Kitchen area in our home over the holidays and this fabric will fit in with the Southwest colors we have chosen.


Saturday, December 17, 2011

Day 2 at the Sun Peaks Christmas Market

Our second day here at Sun Peaks started with a hearty breakfast and then a nice leisure morning stroll through the village before we opened up for the Christmas market.


This is Justine who was one of the vendors that shared our space with us at the Nancy Greene's Cahilty Lodge.


She is a grade 9 student and has been raising money for a trip of a lifetime to Antarctica!  This will be such an adventure and we are so excited for her!  You can read more about it on the site Students On Ice Antarctic Expedition 2011.  Justine also has a blog that you can read here.


Debbie was the other vendor set up in our hotel.  She makes really fun reindeer and other ornaments using a chain and skill saw.


We had more Christmas Carolers come by to entertain us and this group was really great!


The highlight for the whole weekend, however, was meeting one of my childhood heroes, Nancy Greene (Raine)  When I was growing up I remember her from the winter olympics when she won a gold and silver medal in downhill skiing for Canada.  I have always followed her life and career from afar and currently she is one of the Senators for our province.  We are staying in the ski lodge bearing her name.


We are off in the morning to Kamloops for an afternoon at Heather's Fabric Shelf where they are having a Sip & Shop Tea Party.

Friday, December 16, 2011

Christmas Market Greetings from the Mountain Tops of Sun Peaks

We are set up at the Christmas market at Sun Peaks this weekend and are fortunate to have internet access so I can blog from here.  This market is very different from your typical Christmas show as the various crafters and artists are set up throughout the ski village in the various hotels.  We are situated in the Nancy Greene Cahilty Lodge and are with two other vendors.  I will share with you who they are tomorrow.


After set-up we went for a walk through the snowy paths avoiding skiiers going to and fro, to check out the local eateries to have our lunch before the market started.  We settled on a quaint little place called the Black Garlic Bistro where we had a scrumptious and tasty meal.


We were also entertained with a few Christmas songs from some local school children.


We are selling until 7:00 and then we will have a nice romantic dinner out and then maybe hit the hot tub and sauna before retiring...

Wednesday, December 14, 2011

New Color Inspiration

A new book I ordered arrived in the mail yesterday titled the Pantone Guide to Communicating with Color 


I was pleasantly surprised with this treasure as it is packed full of color inspiration.  This is not only a guide to using  color but also contains more than 60 pages of color combinations based on different themes like "Luscious & Sweet, Spicy & Tangy, Playful, Festive and so on.


The author of this book is Leatrice Eiseman who is a color specialist and prime consultant to Pantone. She has been labeled as the "international color guru" and after seeing this book I totally understand why and I would like to own more of her other works.


I can see I'm going to get a lot of inspiration from this book and I have it handy on our coffee table for instant viewing.


And speaking of Pantone colors...,  Pantone annouced their color of the year for 2012 ... which is Tangerine Tango ...


I love this spicy and hot new color that is described as a "spirited reddish orange ... to provide the energy boost we need to recharge and move forward".


I will be mixing up the new pantone colors soon and will have some new shades of inspiration to share with you in the new year....

Wednesday, December 7, 2011

How to Attach Our Dremel Buffing Pads

We have been asked on several occasions how to attach our hand made buffing pads to the dremel or rotary tool so I've put together a mini-tutorial for you here.


These are all the parts you really need.  The mandrel #402 piece has a screw in the end with small washer between.    Remove the screw (keeping the washer on the screw) and attach like so:


Note: The little washer is between the screw
head and the buffing pad (it is hard to see).


That's all there is to it....  Happy buffing....

Another Lizard Collar and Ebbtide Shell in New Colors

We are now busy preparing for our last market for the Christmas season which will be the 16th and 17th at Sun Peaks.  We have our hotel room booked and plan to take a little time out for enjoyment and combine it with an anniversary get-a-way.  This is a fairly large Christmas market and our booth will be in the Nancy Green Cahility Lodge.  We have been working on some new designs to sell there and I have been experimenting with new color combinations.


This is another "Lizard tail collar" I created this time in a cranberry red, green and gold.


This is another design of ours combining our Ebbtide Snail Shell with matching Tie Dye beads in the same color combo.


I really love this color combination as it reminds me of a vintage Christmas style tapestry fabric.

Tuesday, December 6, 2011

My Dream Machine Has Arrived!

I finally received my Dream machine and said I would share with you what I thought.  I was hoping for something that would be much stronger and larger than my Atlas but also affordable.  Even though the machine is still quite expensive, with the amount of work we do we decided it was time for something to help increase production.  


There is a little wrench included with the machine (for removing the blades for cleaning) and since I am always misplacing things I used a magnet to attach it to the one end so it is handy when needed.


I'm also still going to use my "modified" Atlas machine and have moved it over to my side counter.  I plan to use it only for my transluscent clay when I'm in the middle of a project and do not want to stop to clean the blades on my Dream machine.


I made a list of things that are unique about the machine and have put them here in point form:


- The machine is very heavy and solid and because I purchased the motor as well, it does not need to be clamped down.


- The motor has two settings -- regular and reverse -- this I really like!


- The thickness settings are different than my Atlas where the #1 or thickest setting is a little thicker and the #2 is somewhat equal to the #1 on the Atlas.  The first thing I did was to run my clay through at the various settings to familiarize myself with them.


- The dial to adjust the sheet thickness is quite unique as you can turn it in either direction or keep going all the way around in the same direction.  In other words, when you are at the # 1 setting no matter which way you turn the dial, it is switching to #2, #3 and so on.  I'm assuming that would mean less parts to worry about that can break down.


- I tested out all the settings and have found the #8 setting to be very thin.  There are still two thinner settings going up to #10 which caused my clay to ripple quite a bit.  I don't  see a need to use those two settings, however, as I found that the eighth setting was about as thin as I would want it.


- Cleaning the scraper blades is not as easy as they make it out to be.  I found removing and cleaning the blades on my modified Atlas machine much easier and quicker to do.  


To remove the scraper blades, there are two bolts to unscrew on each side which are very awkward to get at.  They provide a wrench (the one that I showed earlier) but the space is so narrow you can hardly use it.  After I managed to get the two bolts off I unscrewed the three other bolts and then pried the scraper blade off for cleaning.  Then to put it all back again and replacing the two side bolts again was the most difficult.  Then you go through it all again to clean the scraper blade on the other side.  This is definitely not an easy process and I do not want to do this very often.


*** Update: ***
Thanks so much to Sue who left a comment here, I discovered you do not have to take out the side bolts like they show in the instructions.  As a matter of fact I couldn't believe how easy it really is.  I removed both blades to clean in a matter of seconds.  I also found it was best to not tip your machine over but leave it standing upright when you do this.  Hope this helps.


So all in all, I am really happy with my purchase and since I have the motor, I should notice some relief in my shoulder pain and hopefully make working with my clay more productive.

Sunday, December 4, 2011

Recovering from a fun weekend

We are still recovering from our fun yet totally exhausting weekend.  It started Friday evening with our Chase Country Christmas parade which was pretty impressive for a little village.  I have to apologize for the quality of the photos but night photos are very hard to take with moving objects but I wanted to give you a little glimpse of some of the impressive floats, all with the candy cane theme.


The grinch riding the candy cane was one of my favorites and the person dressed up was even more impressive!


There was lots of food there too and our friends were there with their delicious fresh and hot mini doughnuts which we could not resist!  yumm!


We were busy at the Christmas market the next day.  We always book a double space each year so we can display a wide range of our work as well as a large section of end of year clearance sale items.


We have one more Christmas market to go which is in two weeks at the Sun Peaks Resort.  We will fill you in on it more later....

Wednesday, November 30, 2011

Chase Country Christmas

I cannot believe it has been three years since we moved from the Vancouver coast to the little Village of Chase in the mountains and right next to the Shuswap lake.  The first weekend of every December is the Chase Country Christmas which is becoming a real tradition for us along with all the other people who live here and in the area.


Candy Canes are the theme for this year which is what inspired me to make the candy cane beads to create our candy cane jewelry.  (To make your own, see the "free tutorials" at the top of this blog.)


We had some of our candy cane sets for sale at our first two Christmas markets we were in and sold out both times so had to make more for this coming market.


Besides the usual market, there are other activities throughout the weekend.  Small local businesses such as the grocery store, hardware store and drugstore sponsor different events which are a great way to get to know our neighbors.


Here is a schedule of events to give you an idea of all the fun:


We are hoping the weather cooperates for the parade Friday evening.  It has snowed on and off but fortunately none of it has stayed on the ground.

Monday, November 28, 2011

Peppermint Swirl Buttons

I had a request to make little peppermint swirl buttons in red and white so this is how they turned out...


Carla posted a photo of the finished sweater with the buttons.  She has a wonderful blog about her quilting and other beautiful projects which you will find here....


We are busy this week getting ready for our last two Christmas shows.  Hope you all have a good day!

Friday, November 25, 2011

Our New Button Packaging

Our new button packaging that was on backorder for some time finally arrived so we have been busy repackaging our inventory.  They are the crystal clear packages and show off the buttons better.  This packaging sure beats attaching hundreds of buttons to cards that end up coming off or tearing.  They also keep the buttons clean from all the handling.


We've been making our rounds to all the stores that carry our buttons and have been changing their inventory over to the new packaging as well which they are very appreciative.  They all like the new look as well and feel sales should increase even more.

Wednesday, November 23, 2011

My Polymer Clay Addiction

Even though I do not smoke or drink alcohol or coffee, I must confess I do have one addiction and that is to my polymer clay.  I do not eat it, of course, but I love to play with it sooo much I cannot help myself.  My friend, a fellow clay artist, Wendy, asked me if I ever sleep.  Well to answer that I do sleep -- actually I think I sleep a lot.  I get at least 9 hours each night and sometimes I even sleep in the day.  So other than sleeping and eating, let's just say a good amount of my time is taken up with my clay.

This past week we have been busy with other things such as catching up on bookwork (ugh!), making more Dremel buffing pads, and packaging buttons.


Speaking of Dremel buffing pads, I was having a hard time finding more of the material we like to use when we make them but I was looking for the same cloth in the dark yellow color.  I finally found some but it was in pink this time.  My claymate Dave must be a liberated man as he said he doesn't mind working with the pink ones as long as they still do the job.  (Grin)

Anyhow, all this extra stuff has taken me away from my clay habit and I was telling Dave I had these strong urges and was almost feeling symptoms of withdrawl.  He told me that there must be some sort of intervention for such a thing but then maybe my habit isn't so bad since it is at least productive!

Sunday, November 20, 2011

Polishing Your Polymer Clay Pieces With a Dremel

For some time we had been searching for the perfect finish for our polymer clay.  We prefer a more natural sheen when a piece has been sanded smooth and then buffed with a soft cloth.  But after some time we found the pieces would go dull and look lifeless.  We started experimenting with various varathanes and glazes but were not totally satisfied.  We found if you didn't put it on just right it would leave streaks and if the glaze was too thick it looked too much like shiny plastic".


I then came across an article posted by Lindly Huanani titled "Stop the Glop".  As soon as I read it, I knew we were finally on to something.  The article was regarding how so many people try to add all sorts of glazes on their polymer clay pieces when you really do not need anything at all.  She went on to mention about using an archival type wax such as Renaissance.


We decided to give it a try and were amazed at the beautiful finish it gave!  This is what we discovered and how we prefer to use it.


1.  Sand your pieces first until you have a nice smooth finish.  You will find instructions on sanding your pieces in the "Polymer Clay Tips" section at the top of this blog. 


2.  Apply the wax to your clay pieces and allow to "dry or soak in" for a minimum of 10 minutes.  The longer you leave it, the better the finish.


3.  To remove the wax we use two different cloths.  One is a piece of a cotton rag for wiping off the excess wax .  The second cloth is used for buffing such as an old rag t-shirt or piece of denim.


4.  For a high shine, after (or instead of) the second buffing by hand with the cloth, you can buff your piece with a buffing wheel.


We use a simple dremel set-up in a drill press for easier handling (as shown).


We did not like the buffing pads that you buy for the dremel as they were too harsh so we followed Desiree McCrorey's instructions for making your own.  The most difficult part was finding the right material.  We tried various types of fabrics and discovered they are all not the same.  Some of them were so harsh they would actually damage the clay piece.  When we found the right material we could not believe the difference it made.  Our pieces buffed up to a high shine in a matter of seconds when using just the "lightest touch".


You can make your own buffing pads like we did, or if you would prefer to purchase them already made we now have more available in our ArtFire studio.  We sell them in a pack of three so they will last you a while.  (Just click on the  photo below to order.)


Saturday, November 19, 2011

Introducing Katja's Quilt Shoppe

Our work has been slowly expanding into more stores and as of this week, our beads, buttons and shawl pins are now sold in 7 quilting, yarn and craft shops.


Katja's Quilt Shoppe in Kamloops is now selling some of our handcrafted buttons and we will be making some specialty items just for her store which I am quite excited about.  I will show you a hint of what I will be doing.  Katja has a quilt pattern logo that she uses throughout her store.  She had asked if it was possible for me to put her logo into clay so I wanted to give it a try.  Here is the cane I created before the final reduction:


And here is the store logo (I took a photo of the one on the store window):


And now here is a pendant I made with the cane for Katja.


I didn't like how the cane became slightly distorted when I reduced it so I am working on some ideas on how to get around that.  I would like to get into creating other quilt patterned items and this was a good jumpstart for me and I can hardly wait to do more.