Friday, April 29, 2016

Changing Up Our Snap Base Jewelry Pieces

With the interchangeable snap jewelry, there are so many options to create your own styles.  We like to sell a variety of the commercial snap base items but most of them we have reworked or changed to fit even more into our Interchangeable Collection.  For instance, we have added our clip clasp to various items so they can be easily interchanged and worn in different ways (see photo below).

A - Attaching pendants to scarf bails
B - Attaching pendants to necklace cords
C - Attaching and interchanging necklace ribbons
D - Attaching charms or eyeglass holder rings


This little flower snap base finding is a fun piece that can be used in so many ways just by adding various components. 


 As a pendant (with the added clip clasp shown below):


As a clip on charm for keychain, jeans or handbag:


Turn it into a longer style necklace:


Join several to create a multi-snap necklace:


These are some new rainbow jellyroll snaps we created.  I love the bright colors!  The necklace below has our velvet necklace straps added.   The velvet ribbon is colorfast (will never bleed) and is hand washable.  Pat dry with a towel and is nice and soft to wear again!


Or even make it into a necklace eyeglass holder:


And of course, you can also add polymer clay as shown in part 2 of my Snap Jewelry tutorial:


** If you are looking for some of the components or findings that we used here and in our tutorial lessons, most of them are sold in the jewelry supply section of our online store.  And don't forget our 10% off coupon is good until tomorrow night.


Wednesday, April 27, 2016

Creating Items with the Art Deco Art Nouveau Patterns

Here is another design I created using my technique "From Scrap Clay to Art Deco" that is one of my favorites.  I made some into buttons (for sewing) as well as snaps (for the interchangeable jewelry).  I added Swarovski crystals to several that I just love. 


Art Deco / Nouveau "Snaps" for Interchangeable Jewelry

Art Nouveau "Snap" with embedded Swarovski Crystals
And I also made some Natasha beads from the same scrap clay.  As a matter of fact that is how I first discovered this new technique.  I was making "Natasha" beads and was experimenting to see if I could create the fabulous patterns in other forms such as a veneer or cane.


My tutorial, From Scrap Clay to Art Deco, takes you step by step into creating or manipulating your scrap pile to achieve the best results.  These tips can also be applied to making better "Natasha" style beads.  It is so much fun and watch out as it is almost addicting!


Friday, April 22, 2016

Vintage Lace Design using My Art Deco Technique

It is so exciting to use up a lot of our clay scrap left-overs to create some unique patterns.  I had a pile of white clay scrap after cutting out flower snap and button designs that I was saving.  Rather than just mixing it all up, I added some cane scraps for more color and wanted to see what the results would be using my Art Deco technique.


The result was the complete opposite when using black as a contrast.  Instead of bright and bold designs these patterns have a soft vintage look.


I love this technique as each Art Deco piece is totally unique.  Each time I slice and arrange the pieces is like opening a present revealing a surprise inside.

Vintage Lace "Snaps"
Vintage Lace Snap on the Fancy Heart Pendant
These snaps have genuine Swarovski crystals embedded into the centers for some added sparkle.  


Vintage Lace "Snaps" and on a Snap base ring

Friday, April 15, 2016

Buttons for Sewing in Art Deco and Nouveau Designs

It is that time of year again when Heather's Fabric Shelf holds their (7th) annual quilt show at their new store location in the Brock Shopping Centre on the north shore in Kamloops.  The quilt show itself will be set up in the Brock Activity Centre right across from Heather's.  Donna's Yarn & Craft Center relocated their store to the same shopping center as well and so this year we will be set up in their store this coming Sunday to demo our clay and show off our new spring button and snap jewelry collection.


Here is a peek at some of our new Art Deco and Art Nouveau button designs.  These buttons have a metal shank for sewing and a silky smooth finish which are perfect for those hand knit sweaters.


Metal shank for sewing

Thursday, April 14, 2016

From Art Deco to Art Nouveau

I have been sorting and cleaning up more of my "scrap clay" piles and creating new designs from them.  All of our clay "left-overs" go into containers that are either sorted by color or color combinations.  I had picked out enough combinations that I thought would make some good Art Deco patterns using my new technique that I now have published in a fun and easy tutorial.


When I mixed up one of the combinations, I was quite pleased with the results and how the overall pattern was much softer and had more of an art nouveau look rather than the brighter art deco.


Teal and lime green are two of my favorite colors and when I saw the results from this batch, I had to make a set of snaps for myself to wear!  The cool thing about this technique is that you can make up lots of beads, snaps and even buttons to create a coordinating theme, yet each pattern is completely unique and one of a kind.


If you look closely, you will see there is some mirror imaging involved.  If you are one of those who can not slice your clay perfectly even or have one of those expensive or fancy slicers, you do not have to worry about that.  We do not have a cane slicer of any kind and slice all our canes by hand.  In my lesson I have some tips on how to create perfect mirror images, even if your slices are not all evenly sliced!


You can now purchase some of our best selling findings like the gorgeous rhinestone ring with the snap base (above) and snap base pendants and bracelets (below) in our snap supply section of our online store. But hurry if you want some as we only have a limited supply and will be several months before we can get another shipment in!


And don't forget to use the coupon code to receive a discount on your total purchase from our online store


Sunday, April 10, 2016

Crackly Goodness in a Snap! - mini tutorial

I am always experimenting with various ways to work with alcohol inks and also creating crackle effects, so I was intrigued with Barb Fajardo's "Crackly Goodness on Polymer Clay" lesson at CraftArtEdu as it combines both.

I really enjoyed the lesson and picked up a few tips but I find the inks to be super messy and so unpredictable!  I know some "clayers" love the unpredictable part and at times I do to!  But there are times when we make a piece and then someone contacts us and says "how much they love those colors and can we make another one for them".  Working with regular polymer clay colors that is not an issue as we record all our clay color recipes, including combinations and blends.  But when it comes to inks, however, that can be a big problem.  This is an example of 3 scarf jewelry pieces we made using the same 3 ink colors and how each one came out slightly different.  Since we realized this is what happens, we make sure we color the beads the same time as the scarf bail so they match.


Also, working with alcohol inks can be extremely messy!  I purchased the Tim Holtz Ink Palette sometime ago and love it but you can see how the colors were starting to get all over the place.


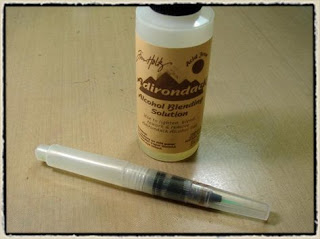
Then I discovered a new method that is so much cleaner and works incredibly well!  Tim Holtz shows how you can fill a water brush with the Alcohol Blending Solution and using it to paint with.  The cool thing is that the brush is pretty much self-cleaning when you are switch colors!  You can see the entire lesson here.  Even though it is for making cards, the ink painting in steps 1 to 4 are all you need to follow.


I could hardly wait to try this but had to wait until I could track down one of those cool brushes.

My first attempt with this method was to make some "snaps" using Barb Fajardo's Crackly Goodness technique.  I was pleasantly surprised as to how much fun it was and easier to clean the brush (wipe on paper towel) between colors!


Some of the snaps I used silver (I can't say anymore or I would give part of the tutorial away) to match the silver colored bezel on the snap and I tried one (the flower) with black which was quite cool and gave such a different effect.